Easy 3d Art Projects for High School 3d Art Ideas for Middle School
Modular Sculpture: Easy 3D Lesson
If you are looking for an inexpensive sculpture assignment that teaches the foundations of 3D art, try out this modular sculpture art lesson! I taught this to my 3D Design class that always has quite a mixed bag of students. Many have not taken any other art class in high school and are true beginners. I wanted to teach a unit at the start of the semester that focused on the basics of sculpture.
Tate defines modular as "a term used particularly in relation to minimalism, referring to a work of art with constituent parts that can be moved, separated and recombined." Read more about this minimalist style of art here.
Modular Sculpture Full Length Video
If you prefer videos to reading, this free video will describe my entire process and is 100% classroom ready. I like to teach each step and then send students to this video for reviewing steps or as a quick visual reminder at the start of class after I've already live demonstrated a technique. It's great for Canvas or Google classroom, and if students are quarantined (hello, 2022) they can easily catch up without me having to stand over them.
Modular Sculpture Materials
- Popsicle sticks or toothpicks (I started with 30 per student)

- Elmer's glue
- Hot glue guns and glue sticks
- Acrylic paint (or spray paint)
- Cardboard cut into squares/rectangles for bases
This description contains affiliate links to products I truly love and use in my classroom. If you use these links to buy something we may earn a commission at no additional cost to you. #artteachersidehustle
Creating Modules

We start by creating our modules using popsicle sticks. You can also do this with toothpicks, straws or any material that is inexpensive and can be bought/found in bulk. I got lucky and the science department was getting rid of tons of popsicle sticks, so I stocked up.
Before we start, we discuss what modules are (see link above) as well as geometric shapes. I like to use Elmer's school glue for this step because it's cheap and does the job. Wood glue could also be used, but it is a more expensive option. This does not take an entire class period, but it may depending on how many modules students are making and how long your classes are.
Painting Options
Once the modules are dry, we paint them with acrylic paint. There are several options for doing this depending on your access to materials, class size and personal preference. Spray paint is hands down the easiest and fastest option. The negatives are that it is expensive and you may not have an area to do this with large class sizes, or small groups with supervision.
The first time I taught this, we constructed the sculptures first and then painted. It was a little annoying to get into all the cracks and crevices, and it had a different texture over the hot glue. The second semester I had students paint each individual module before construction. It was only a little more time consuming and I feel like the craftsmanship improved because the glue was less obvious.
Constructing the Modular Sculpture
Once students had at least ten modules, we began constructing the sculptures using hot glue. It was really fun to watch the sculptures come alive. Students had to problem solve as their sculptures grew taller to achieve balance. Students were instructed to look at their sculptures from all sides and make sure it was interesting "in the round".


Some classes got competitive and wanted a height challenge. I had extra popsicle sticks and let them make as many modules as they wanted. Two students in different classes stored theirs next to each other and competed each day. The winner measured in at almost four feet tall.
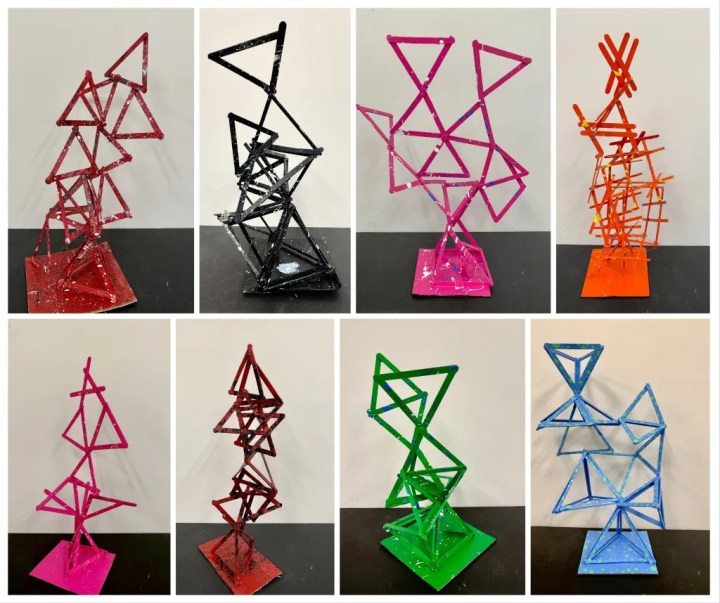
The end results are a fun and colorful example of creating 3D art that serves as a foundation for the rest of the course. I teach clay, wire, plaster carving and found object relief sculptures and each technique builds on the foundations explored while constructing modular sculptures.
Modular Sculpture Teaching Resources
My students complete daily warm-ups developed from the Feldman's method of art criticism. We start with a sketch as our form of description, then analyze using art vocabulary. On day three we interpret the message, theme or meaning and then finally we evaluate and state our opinions. Students have sketchbooks they complete each daily task for a weekly sketchbook grade. It creates great classroom routines and ample opportunity to address all those art standards that can easily be overlooked.
Artist Connections
If you are looking for artists to teach with this modular sculpture art lesson, take a look at these two artists my students investigated.
Rasheed Araeen is a great artist to study minimalism, geometric shapes and modular art. You can read about his work here on the Tate Museum website.
Camilla Løw is another artist that connects to minimalism and geometric shapes. She creates fun sculptures that are great examples of non-objective art. See examples of her work here.
What are your favorite low budget sculpture assignments? I'd love to hear from you!
Subscribe so you never miss a post.
Source: https://thatartteacher.com/2022/01/13/modular-sculpture-art-lesson/
Post a Comment for "Easy 3d Art Projects for High School 3d Art Ideas for Middle School"